Zum Gali Gali Rubber Stamps
presents
Reduction block printing
Zum Gali Gali Rubber StampspresentsReduction block printing |
|
Reduction block printing is a technique for multicolor printing that was a favorite of Picasso. It's a good thing for adventurous eraser carvers to try. If you haven't carved several eraser stamps, don't try this yet.
Reduction prints get their name because you reduce your block for each new color. What you do is carve a little and print all your prints in the lightest color, then carve some more and print all your prints in the next lightest color, carve some more and print in a darker color yet, and so on. Three colors is enough to get really interesting prints, but you can print as many stages (and therefore colors) as you want. One thing you have to understand right at the beginning is that you can't go back and print more of the first color after you start carving for the second color! You will always be making a limited edition. If the second stage of your carving is the most beautiful stamp you've ever carved, and you go on to a third stage, tough luck! Print lots of copies right at the beginning -- more than you think you want, because you'll probably ruin a few in later stages.Before you're put off by all that, google "reduction block print" and look through the images there. For lots more inspiration, check what Picasso did with reduction linoleum cuts in Picasso Linoleum Cuts, Metropolitan Museum of Art, NY, ISBN 0-87099-404-2.
Now let's back down from fine arts to stamping. Here's a three color reduction print that I carved in a 2 inch square of NASCO printmaking material. The first print was the lightest color, a greenish yellow. I carved away ONLY the areas that show up in the background, paper, color.
Here's a print in black from the block at the first stage. I had recently built myself a little press from a couple of pieces of plywood, strap hinges, a piece of scrap handrail for a handle, and brass clips to hold the paper. I nailed strips of wood to the base to form a little nest for the block so I could put it in the same place for each print, and fit the paper against card stock glued to the top of the press so the paper would be in the same place for each impression.
After printing ALL the copies I would ever want of that I carved away some squares and the space between tic-tac-toe board and the outline, leaving this as the second stage. I inked this block up with bright green and printed it over the first stage.
Here's what it looked like at that point. All that was left was to remove the squares that already had spirals in them, carve positive spirals in the four corner blocks and a negative one in the center block, and carve away the corners of the inner square.
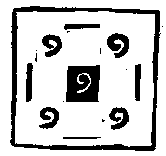
The final block had ONLY the areas that were to show up in the darkest color. A print from just the final block looked like this:
OK -- there's my introduction to the subject. Here are a couple more places to look on the web, or google "block print", "reduction block print", and "block print registration."
www.woodblock.com -- a BIG site with emphasis on Japanese woodblocks
| Back to Things To Do page |
Home |
Last updated August 22, 2015